Last updated on 21. März 2019
First of all, if you try MAMP-Pro it will fail on the last step of TYPO3 9.x FIRST_INSTALL with some database problem due to field length in VARCHAR(255) fields and utf8_unicode_ci versus utf8mb4_general_ci. I couldn’t solve the problem and changed to XAMPP VM. XAMPP is open source, so anyway the preferred path to go. (March 2019)
XAMPP VM
1. Get XAMPP VM and run the installer on OSX
Here is the home page of XAMPP: https://www.apachefriends.org
It is available for Linux, Windows and OSX. There are two versions, one is the normal version, that runs on your operating system and a new way of having it in a virtual machine. I chose the virutal machine. The second thing is, that it comes with a pre-installed version of PHP. Switching PHP-versions is not so easy, compared to MAMP-Pro where you have a graphical interface. So the first step would be to install XAMPP VM 7.2.16 (PHP 7.2 because most TYPO3 extensions are not ready for PHP 7.3 – March 2019). Download:
xampp-osx-7.2.16-0-vm.dmg
Then you execute the .dmg Mac-Installer form the downloaded file and transfer the app into the applications folder of your Mac.
You will get the software in the Applications-Folder of OSX:
/Applications/XAMPP.app
Executing the software for the first time will create a settings file in your Mac-home-direcotry:
~/bitnami/stackman
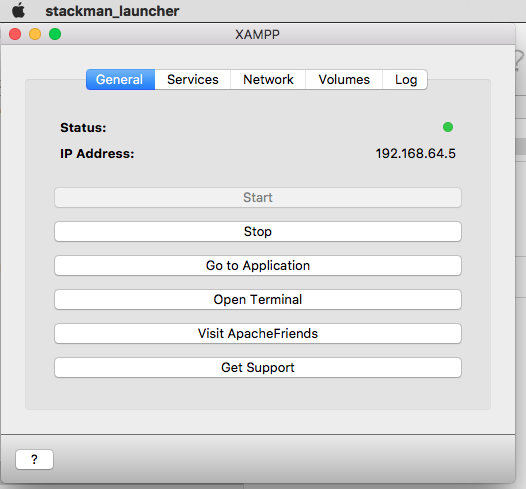
Now press the start button and go.
In Services you start Apache, the Database and the FTP programme. Network enables the port 80 on your localhost. Access in the browser will be: localhost:8080/hereIsYourFolder
YourFolder has to be in the htdocs-folder. To see the htdocs-folder you can go on Volumes and mount the virtual volume that will be mounted on /opt/lampp/…
With „Open Terminal“ you can open the terminal (bash) for XAMPP.
2. What is where? Important to understand!
There are 3 different levels now:
– level 1 = your Mac OSX system (could also be Windows)
– level 2 = a debian installation root@debian LINUX level 1
– level 3 = your working level on /opt/lampp/ = LINUX level 2
It is important to understand, that even if you run PHP 7.2 on Linux level 2 by default of your installation package, your bash is located on level 1 and is having a different PHP version!
Opening the XAMPP-Terminal you will start from your home directory of the debian root level (1). So first thing to go is to root:
> cd /
Here we need some more software:
composer = to install TYPO3 the way it is now preferred
imagemagic = TYPO3 needs it to deliver pictures in the right size
php-imagic = (not sure whether TYPO3 needs it), it is a library that connects imagemagic to PHP
vim = to write in the configuration files
First we need to get the list of the packages available with apt-get update. If you miss this step, apt-get will tell you, that there are no packages with this name.
apt-get updateNow we can install the software on debian root level (1):
apt-get install vim
apt-get install composer
apt-get install imagemagick
apt-get install php-imagick
3. Where is the bash/terminal PHP located?
If you now got to debian root: cd /
You can check the PHP-version:
> php -v

- PHP 7.2.16 (cli) (built: Mar  8 2019 15:11:10) ( NTS )
Copyright (c) 1997-2018 The PHP Group
Zend Engine v3.2.0, Copyright (c) 1998-2018 Zend Technologies
But if you check the configurations files in root@debian # /etc/php, there is a little surprise:
> cd /
> cd /etc/php
> ls -la
> 7.0
> cd 7.0/cli/
> ls -la
-  conf.d
-  php.ini
> vim conf.d

Here you find all configuration for php 7.0
This will later on cause the problem, that composer, while trying to install TYPO3 9.5.x, will abort the installation because it is seeing the wrong PHP-version. Composer will not install TYPO3.
If you now try
> apt-get install php7.2
It fails!
„E: Unable to locate package php7.2“
The solution is here:
https://www.rosehosting.com/blog/how-to-install-php-7-2-on-debian-9/
> apt install ca-certificates apt-transport-https

> wget -q https://packages.sury.org/php/apt.gpg -O- | sudo apt-key add -

(The second comand "wget" gives a warning, but just ignore it!)


> echo "deb https://packages.sury.org/php/ stretch main" | sudo tee /etc/apt/sources.list.d/php.list

> apt-get update
> apt-get install php7.2

> apt-get install php7.2-cli php7.2-common php7.2-opcache php7.2-curl php7.2-mbstring php7.2-mysql php7.2-zip php7.2-xml

(Whether you need all the php7.2 additional modules, I don't know, since we are operating here only for the bash/Terminal and not for the the Apache/TYPO3 area.)update: YES you do need them!

(If you check now:)

> cd /etc/php/
> ls -la
- 7.0
– 7.2


Now composer will work!
3. Installation of TYPO3 9.x with composer
With the bash go to:
> cd /opt/lampp/htdocs
> mkdir folderForTYPO3
> chown -R bitnami:root folderForTYPO3
> chmod -R 777 folderForTYPO3

We made a folder for our installation and gave it all rights  -777 - since this is just for development on a Mac. "bitnami" is the owner of the server process, so this process now will also own our folder -> meaning it can write in it, but anyway the rights are 777.

> cd folderForTYPO3

> composer require typo3/minimal

> cd public
> touch FIRST_INSTALL

Now we will get inside our folder, the composer TYPO3 folders and files. Ignore the warning that you should not use composer as root. We are on a development server so we have no problem with this.

To call the website on the server we must go for:

localhost8080/folderForTYPO3/public/

Make sure that "localhost8080" is enabled on the XAMPP control window!
4. Adding a database
phpmyadmin you reach with your browser on:
localhost8080/phpmyadmin
There will be a warning in a red field on the bottom of phpmyadmin, that it is slow due to a missing $cfg[‚TempDir‘] (./tmp/)
Use the Bash/Terminal and got to:
> cd /opt/lampp/phpmyadmin

(make the missing folder and give it all rights 777)

> mkdir tmp && chmod 777 tmp
Now you can create an empty databas using phpmyadmin for TYPO3. The coalition should be:
utf8mb4_general_ci
5. FIRST_INSTALL TYPO3
Finally – yeahhh – we can start installing TYPO3 from the browser:
localhost8080/folderForTYPO3/public/
should now run the installation process for a TYPO3 9.x installation.
The process will give a warning, that „max_execution_time“ and „max_input_vars“ are to low. and
/opt/lampp/htdocs/folderForTYPO3/public
is not writable.
Back to the bash/Terminal:
> cd /opt/lampp/etc
> ls -la
> vim php.ini

Look for the max_execution_time and press "a" to go into insert mode in vim. Change it to the number that is suggested. Now add - it is not in the file yet – max_input_vars = 1500

With "esc" you get out of the insert mode and with ":wq" back to the normal bash window.

restart Apache on the XAMPP control window!

Next problem, make folder writable (there is a long cache error message if not):

> cd /opt/lampp/htdocs

> chown -R bitnami:root folderForTYPO3
> chmod -R 777 folderForTYPO3
Now the installation can go on. Choose the database you have created:
User is: „root“ password, leave it empty, since we are not on a real server connected to the outside world.
The long thornily way should be done and you can work on TYPO3 now!
Updates
2019-03-21
This will end in an installation without the Argon2-Hash-Algorithm. For TYPO3 some of the passwords, if you import a data base dump from some other installaton, will not be readable. You have to create a new admin user with the install tool. This new user will have a different hash algorithm for his password.
Author: Thomas Hezel