Last updated on 30. April 2018
The zazu-TYPO3-concept
Here at zazudesign in Berlin DCEs or Dynamic Content Elements got the main extension, that we use in combination with TYPO3. Since the basic structure of the extension TemplaVoila! was outdated, there was only the not so flexible concept of backend layouts to replace it.
Dynamic Content Elements makes it finally possible to code your own little backend modules, so the later user can easily change content, without interfering with the basic structure of a webpage.
In short: make a template, put variables at the places where the content should be placed and then use TYPO3s internal skills to create backend forms, to fill the variables with content – that’s it. Of course going into detail, there is much more behind it and much more it can do – a key word is here view-helpers.
In times of responsive web development this little modules need their own little intelligence, basically a clear CSS driven behaviour for different screen seizes. So a developer has to create the input fields, the templates with variables and view-helpers and a bunch of CCS instructions. In other words you have to put a good amount of time and effort in it. In consequence one must find a way to pass on the DCEs from one TYPO3 installation to another. Better not one DCE, but your little collection, that you developed over time and you are ready to reuse in your basic setup, as an easy and proven installation to start from.
Structure makes work faster especially with a content management system
The folders
If you want to find your slider pictures or your TypoScript text files always at the same place, it is essential to use the same folder structure in all your TYPO3 installation. For the zazu-concept I basically took the structure and rules of the TYPO3 extension development and used it in the fileadmin. So experienced developers will already know where to find what:
- fileadmin
- Configuration
- TypoScript
- root.ts
- news.ts
- contact.ts
- TypoScript
- Resources
- Private
- Layouts
- main-layout.html
- Partials
- Templates
- Layouts
- Public
- Downloads
- Ext
- Fotorama-4.6.
- Fonts
- Icons
- Images
- JavaScript
- Styles
- all.css
- normalize.min.css
- Private
- Configuration
There are some rules about nomenclature:
a. folders always have a upper case letter at the beginning
b. files always have a lower case letter at the beginning
c. files that you want to be indexed by google (e.g. pictures) use hyphens (e.g. me-myself-and-i.jpg)
There is a big exception in this rules, „fileadmin“ itself and it’s surrounding folders are lower case.
Inside the folders you can have more folders e.g. inside Partials could be a folder with the „Powermail-Partials“, that you take along, and point to it, instead of the partials, what come with the extension and get overwritten with every update. In the Ext-folder I put everything (JavaScript, CSS, unique icons) that comes with jQuery extensions like Fotorama, just to make updates easier. Not so consistent is TYPO3 with singular and plural that gives me confusion from time to time. Usually it is plural like „Layouts“ but with „JavaScript“ it is singular for some reason. If you want to be stringent in your system go for plural.
Inside the „fileadmin“ folder there are two folders that are created by TYPO3, that is „_processed_“ and „_temp_“, if they are missing the install tool will give a warning and will help you to create them.
The folder „uploads“, that is on the same level as „fileadmin“, is also created by TYPO3 and hosts for example icons that you use inside a TYPO3 extension, so this folder also have to come along to your next website.
Steps to do, from a master project to at a new project
- create a master installation that has only placeholder content with all your DCEs
- update your master installation and all your extensions
- empty all caches, go through „Important Actions“ in install tool
- download your „fileadmin“ and „uploads“ folders
- make a database dump
- install TYPO3 on the new webspace for your new project
- install your standard extensions (in my case: dce, realurl, powermail, news, sourceopt, metaseo)
- overwrite the „fileadmin“ and „uploads“ folders with your folders from the master project
- run install tool „Important Actions“
- if you stay on the same TYPO3 level and extensions versions , you can import the complete database dump from your master installation
- run install tool „Important Actions“ again
- do a „DB check“ (button left side bottom in TYPO3)
A clean installation
TYPO3 was going lately through a lot of changes, so sometimes you don’t want to take along some old stuff (wrong relations m:n, NOT Null problems) in your database and prefer to start with a clean setup. In this case you can just use phpMyAdmin to export only the DCE related tables of the database from your master installation and import it in your new project, instead of importing a complete database dump.
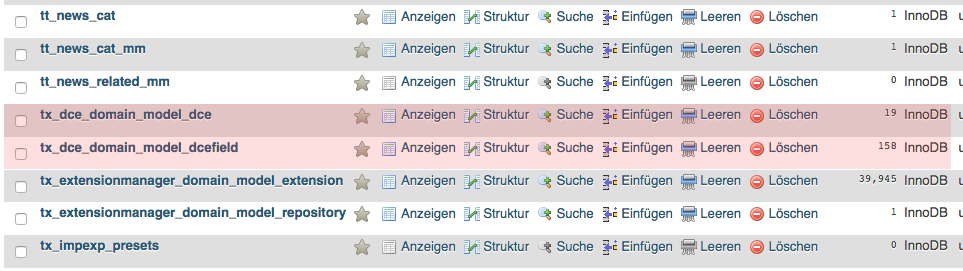
Export only the DCE-tables
- open phpMyAdmin (in most cases in the control center of your webspace provider)
- go to „Export“, choose the option „custom or options“ („angepasst-zeige alle möglichen Optionen an“)
- mark the tables „tx_dce_domain_model_dce“ and „tx_dce_domain_model_dcefield“
- if you want you can save your choise as a pattern („Vorlage“)
- export the tables to a file xxx.sql

Import the file
- go to your new projects database inside phpMyAdmin
- delete the tables „tx_dce_domain_model_dce“ and „tx_dce_domain_model_dcefield“
- click „import“ and import your little database dump with the to tables you want to import
- go to the TYPO3 backend, now you should see all your DCEs in the DCE-menu
What you miss
Now you miss your complete page-tree, that you have to create again, with all sys-folders for news, powermail, backend templates and so on. You also have to adjust your TypoScript to the new page ids and storage folder ids.
What I allways forget
Don’t forget to add the static templates to the root of your page-tree. If you see funny yellow stripes instead of a DCE-output then you didn’t include some static templates. (DCE doesn’t have a own static template but seems to be affected by the others.)
The new template „content element (fluid_syled_content)“ didn’t cover all backend functions of the DCE but I think the developer of DCE, Armin Vieweg, fixed it with one of the last updates (dce 1.4.2). Worst case you can run it together with ccs_styled_content.
CSS and DCE: how to connect specific CSS-blocks to a specific DCE
As mentioned above it is essential that each DCE gets its responsive CSS. The basic concept is to check the size of your browser screen with media queries.
In the template file of the DCE I put a „div“ outside the whole DCE-template and give it a class=“dxx“ with „xx“ for the DCE number of my collection. 2 columns divs start with „2“, 3 columns divs start with „3“.
Then I make my media queries for each DCE!
This seems to be a lot of checking but I couldn’t find any speed difference against having the media queries only ones in the whole CSS-file. Now each CSS instruction starts with „.dxx“ and therefore gives the DCE it’s unique behaviour.
If a DCE should have some different features on a specific page you should add a page count to the body-element (with TypoScript) of your web page and put it at the beginning: #page3 .d22 {background-color: pink;}
Now the CSS can travel directly (copy and paste) with it’s corresponding DCE and be reused in every setup!
Example CSS-code for the DCE with the class=“d22″:
 /*DCE 22 - 2 columns text plus image*/
 /*======= 320-NO Query === mobile first ======= border 5  = 310 ===*/
 .d22 {
 margin-bottom: 2em;
 }
 .d22 img {
 width: 100%;
 height: auto;
 }
 .d22 .colLeft {
 margin-bottom: 2em;
 }
 /*======= 480 ========= MEDIA QUERIES ======= border  6 = 460 ===*/
 @media only screen and (min-width: 480px) {
 }
 /*======= 760========= MEDIA QUERIES ======== border 16 = 728 ===*/
 @media only screen and (min-width: 760px) {
 .d22 .colRight {
 float: left;
 width: 45.74175824175824%; /*333px/728px*/
 }
 .d22 .colRight {
 margin-left: 8.516483516483516%; /*62px/728px*/
 }
 }
 /*======= 960 ======== MEDIA QUERIES ======== border 22 = 916 ===*/
 @media only screen and (min-width: 960px) {
 }
 /*======= 1254 ======= MEDIA QUERIES ======== border 28 = 1198 ==*/
 @media only screen and (min-width: 1254px) {
 }
 /*======= 2512 ======= MEDIA QUERIES ==== border 151-45 = 2396 ==*/
 @media only screen and (min-width: 2512px) {
 }
 /*END-DCE 22*/
Avoiding to many server requests
At the end I clean up the code from all empty media queries and put it through a minimizer programme. After that I put all CSS (jQurey extensions, normalizer, my-css) together in one file. With TypoScript I enable then compression.
That’s it!
Outlook
Armin Vieweg is the developer of the DCEs. As a lonely hero it’s a lot of work to follow all updates of TYPO3 and keep the extension running with the newest TYPO3 versions. So, please don’t forget to donate!
Additional features I would like to have
One concept for the future could be to have the CSS handled directly by the DCE extension. So like the „template-tab“ you also have a „css-tab“ in the backend. DCE could than put all single CSS-parts together in one file that goes in a folder of your choice – even remove empty media queries and minimize the file. You could then put it in a all-css-file by hand and include that one in your page setup.
The database export of the DCE tables and the import could be handled inside DCE, instead of using phpMyAdmin. „Export all DCE tables to a sql-file“ and „Import DCE tables from a sql-file“ – option: „add to existing DCEs“ and „overwrite existing DCEs“.
May be even exporting single DCE-database-entries and import them – this could be the beginning of a DCE-share-platform with uploaded screen-shots, sql-files and corresponding CSS.
Will see what Armin will comment on this 🙂
Dieser Artikel ist in Englisch, nicht um Ihnen das Leben schwer zu machen, sondern um den Autoren weltweit etwas zurückzugeben, die mir auch tagtäglich mit ihren Artikeln helfen!
Autor: Thomas Hezel
[…] If you want to avoid that your changes of the Template-Files getting overwritten with every update you must copy them into the fileadmin. I use the same folder structure in the fileadmin as TYPO3 regulates for every extension. This makes things easier, since I always know what is where. See also my other blog post: Folder Structure in TYPO3. […]
„The database export of the DCE tables and the import could be handled inside DCE, instead of using phpMyAdmin. „Export all DCE tables to a sql-file“ and „Import DCE tables from a sql-file“ – option: „add to existing DCEs“ and „overwrite existing DCEs“.“
You can use the typo3 default import/export function, works pretty good.
DCE Manual:
Comfortable import/export
Quick import and export of DCEs and DCE fields
Uses ImpExp extension in TYPO3 core
DCE instances (tt_content) have relation to DCE
When importing DCE and DCE instances, the uid of DCE will be automatically updated if uid is already assigned on target system